

Look through:
- Thrift stores
- Garage sales
- Flea markets
- Estate sales
- Secondhand marketplaces
- Your kitchen cupboards
Different Bundt pans have different patterns, so don’t worry if they aren’t all identical.
Mixing several shapes can actually make the finished garden display more interesting.
Step 2: Clean the Pans Thoroughly
Before painting or assembling anything, clean the metal surfaces.
Remove:
- Grease
- Dust
- Food residue
- Sticky labels
- Loose dirt
Allow the pans to dry completely.
If the pans have peeling coatings or loose rust, remove anything that is not firmly attached.
For heavily rusted metal, lightly sand the surface before applying an appropriate metal primer.
Step 3: Prepare the Wooden Handles
Old broom handles are perfect for creating the stems of your garden flowers.
If you’re reusing old handles, clean them first.
Then inspect them for:
- Splits
- Rot
- Loose sections
- Sharp splinters
- Structural damage
Sand rough areas until the wood is smooth enough to handle safely.
If you want a colorful garden display, you can paint the handles green to make them resemble stems.
Step 4: Decide How You Want the Bundt Pan to Look
This is where you can personalize the project.
A Bundt pan can be positioned in different ways.
For example, you could make it resemble:
 A giant metal flower
Paint the pan brightly and use the center opening as part of the design.
 A garden sculpture
Use several pans at different heights to create a cluster of oversized flowers.
 A whimsical garden ornament
Add small decorative pieces around the pan to create a more artistic appearance.
 A solar garden decoration
A small outdoor-rated solar light can potentially be incorporated into the center, provided the design is safe and weather-resistant.
Step 5: Paint the Metal
Painting can completely change the appearance of the project.
Before applying paint, use a primer compatible with the type of metal and the outdoor paint you plan to use.
Then choose your colors.
Popular garden-inspired combinations include:
- Yellow and green
- Red and green
- Blue and white
- Purple and green
- Orange and yellow
- Pastel colors
- Metallic finishes
You can also paint the raised ridges in a different color to emphasize the Bundt pan’s flower-like shape.
Step 6: Don’t Skip the Protective Finish
This project is intended for the backyard, which means it will probably encounter:
- Rain
- Humidity
- Sunlight
- Dirt
- Temperature changes
A suitable exterior protective coating can help protect painted surfaces.
Choose a product specifically designed for outdoor use and compatible with your paint.
Always follow the manufacturer’s instructions for application and drying.
Step 7: Attach the Bundt Pan to the Wooden Handle
This is the most important structural part of the project.
The viral-style version may show the pan simply being glued to the wooden handle.
However, adhesive alone may not be sufficient for a garden ornament exposed to wind and weather.
For a stronger installation, consider combining an outdoor-rated adhesive with a mechanical fastener such as a screw or bolt, depending on the design.
A practical approach is to:
- Position the pan on the end of the wooden handle.
- Mark the attachment point.
- Drill an appropriate pilot hole if necessary.
- Apply the outdoor-rated adhesive according to its instructions.
- Add a suitable screw, bolt, or other mechanical fastener.
- Allow the adhesive to cure fully before installing the decoration outdoors.
The exact fastening method depends on the shape of the Bundt pan and the diameter of the wooden handle.
Why Mechanical Fastening Matters
Imagine placing your finished decoration in the garden.
The sun heats the metal.
The wind pushes against the pan.
Rain repeatedly wets the materials.
The wood expands and contracts.
Over time, those forces can weaken an adhesive bond.
A mechanical connection can provide additional support.
For anything large, heavy, or positioned where it could fall onto someone, prioritize a secure fastening method rather than relying solely on glue.
Step 8: Turn One Pan Into a Garden Flower
One of the easiest versions is a single oversized flower.
Start with:
Bundt pan → flower head
Wooden broom handle → stem
Green-painted wood → plant stem
You can then install the finished piece among real plants.
The contrast between natural foliage and the recycled metal flower can look surprisingly attractive.
Step 9: Create a Whole Garden of Metal Flowers
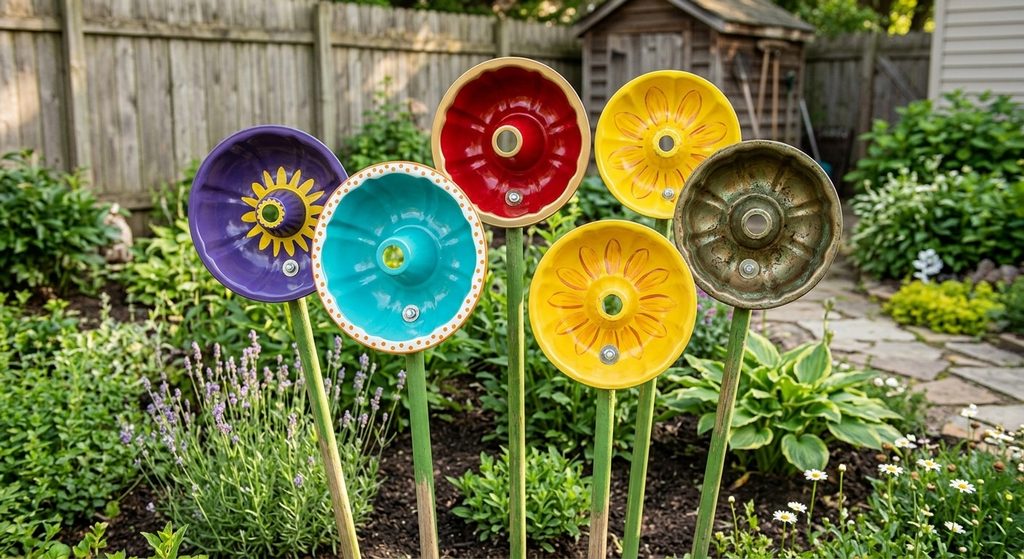
Why stop at one?
This is where the idea can become much more interesting.
Find several Bundt pans in different shapes and sizes.
Attach them to wooden handles of different lengths.
Then place them at different heights.
For example:
- One tall flower
- Two medium flowers
- Three smaller flowers
The result can look like a playful oversized flower garden.
Use Different Colors for Each Flower
You don’t have to paint everything the same color.
A colorful collection can make the display much more eye-catching.
For example:
Flower 1
Yellow center with green stem.
Flower 2
Blue petals with a white accent.
Flower 3
Red-orange finish with a green stem.
Flower 4
Purple with a contrasting center.
The goal isn’t perfection.
The slightly mismatched appearance is part of the charm of upcycled garden décor.
Add a Solar Light
Here’s another clever variation.
If the shape allows it, you can incorporate a small solar-powered outdoor light into the center of the Bundt pan.
During the day, the pan acts as a decorative feature.
After dark, the light can make the garden ornament stand out.
Make sure any electrical component is specifically designed for outdoor use and installed according to the manufacturer’s instructions.
Avoid modifying electrical components in ways that compromise their weather resistance.
Create a Butterfly or Insect Garden Theme
You can take the project beyond flowers.
Paint several Bundt pans in bright colors and place them near a flower garden.
Then add small decorative butterflies, bees, or dragonflies.
This can create a playful garden theme without requiring expensive ornaments.
Just be careful with small decorative components if children or pets regularly play nearby.
Use Reclaimed Wood for the Stems
You don’t necessarily need brand-new broom handles.
You could potentially reuse:
- Old wooden handles
- Garden tool handles
- Straight wooden dowels
- Reclaimed wooden poles
Before using reclaimed wood outdoors, inspect it carefully for rot, splitting, nails, and other hazards.
Sand rough surfaces and seal the wood with an appropriate exterior finish if desired.
Make the Project More Weather Resistant
If you want your garden décor to last more than one season, think about each material separately.
Metal
Protect it against rust with an appropriate primer and exterior coating.
Wood
Use an exterior wood finish suitable for outdoor exposure.
Adhesive
Choose an adhesive specifically rated for the materials and environmental conditions.
Fasteners
Outdoor-rated screws or bolts can help resist corrosion.
The better you prepare the materials, the longer your garden decoration is likely to remain attractive.
Where Should You Put the Finished Decoration?
Placement can make a huge difference.
Consider placing your recycled Bundt-pan flowers:
- Along a garden path
- Beside a vegetable garden
- Near a patio
- Around a backyard fence
- In a flower bed
- Beside a shed
- Around a tree
- Near a garden entrance
Avoid placing them where they could create a trip hazard or interfere with lawn equipment.
Create a Garden Border With Them
Another creative idea is to use several ornaments as a visual border.
Place them at regular intervals around:
- A vegetable garden
- A flower bed
- A walkway
- A seating area
You can use the same paint colors throughout the display to make everything look intentional.
Don’t Throw Away Imperfect Bundt Pan
One of the best things about this project is that the pans don’t have to look perfect.
An old pan with:
- Scratches
- Faded coating
- Minor discoloration
- Small cosmetic imperfections
can still become beautiful garden décor after preparation and painting.
That’s the essence of upcycling:
Instead of asking whether an object is still useful for its original purpose, ask what else it could become.
A Great Project for Families
This can also be a fun weekend craft project.
Adults can handle:
- Drilling
- Cutting
- Fastening
- Structural assembly
Children can participate in age-appropriate activities such as:
- Choosing colors
- Painting prepared pieces
- Designing patterns
- Decorating the finished flowers
Always supervise children around tools, sharp metal edges, paints, adhesives, and small parts.
Safety Tips You Shouldn’t Ignore
Before putting the finished decoration in your backyard, check everything carefully.
Smooth sharp metal edges
Old pans may have rough or sharp areas.
Secure the wooden handle
The stake should be stable enough for its intended location.
Make sure the pan is firmly attached
Don’t rely on a weak glue bond for a large or heavy decoration.
Check the installation after strong wind
If the ornament becomes loose, repair it before using it again.
Keep pathways clear
Don’t place decorative stakes where people could walk into them.
Choose outdoor-safe products
Paints, sealers, adhesives, and electrical components should be appropriate for outdoor use.
How Much Can This Project Cost?
One of the biggest advantages is that the basic materials can be inexpensive.
If you find the Bundt pans and handles secondhand, your main expenses may be:
- Primer
- Paint
- Exterior sealer
- Fasteners
- Adhesive
And because many of these materials can be used for multiple projects, you can potentially create several decorations without spending much.
Why This DIY Idea Works So Well
The design has several characteristics that make it perfect for social media.
It’s:
Affordable.
You can use secondhand materials.
Simple.
The basic concept is easy to understand.
Customizable.
Everyone can choose their own colors and decorations.
Recycled.
Old household items get a new purpose.
Eye-catching.
Large colorful metal flowers naturally attract attention.
Garden-friendly.
The finished pieces can add personality to an outdoor space.
More Ideas Using Old Bundt Pans
Once you start looking at an old Bundt pan as a craft material rather than cookware, the possibilities become much broader.
You could experiment with:
Garden bells
Add hanging elements beneath the pan to create a decorative sound feature.
Bird-feeding stations
With the right design, some pans can be repurposed as feeding platforms, provided they are securely installed and made from suitable materials.
Wall décor
Paint the pans and mount them to an outdoor wall or garden shed.
Planter accents
Use them as decorative surrounds for planters.
Garden signs
Combine painted metal pieces with wooden signs to create personalized garden décor.
The Best Part: Every One Can Be Different
You don’t need to reproduce the project exactly as shown.
In fact, the most interesting version may be the one you create yourself.
Try different:
- Pan shapes
- Heights
- Colors
- Finishes
- Wood types
- Decorative accents
You could create a garden filled with unique recycled pieces rather than identical store-bought decorations.
Final Thoughts
The idea of attaching thrifted metal Bundt pans to wooden broom handles is a perfect example of creative upcycling.
Something that might otherwise sit unused in a cupboard—or end up in the trash—can become a colorful focal point for the backyard.
With a little cleaning, paint, creativity, and a properly secured attachment, old kitchenware can be transformed into oversized garden flowers that add personality to an outdoor space.
So the next time you see an old Bundt pan at a thrift store, don’t look at it only as an outdated baking dish.
Look at it as a potential garden decoration.
One old pan + one wooden handle + a little imagination = a completely new backyard feature. 
Leave a Reply